|
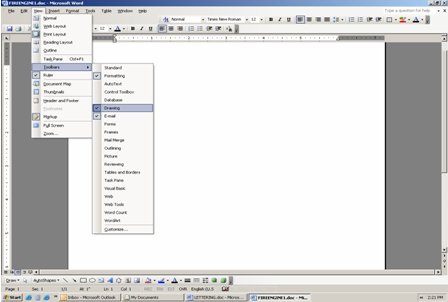
Making your own Decals Well, it’s been a while since the first segment was published. Since then, I have been busy with my own projects, Cub Scouts, Soccer, Basketball, and dealing with the Missus, who thinks I spend entirely too much time on my Hobby. To that end, The Union of Domestics, Soccer Moms and Homemakers, Local 1, essentially went on strike. This brought the Stepjam Works Ltd. to a temporary halt. I tapped into diplomacy skills that I never knew I had, and a mutually equitable contract was ratified. Phew. In the first segment, we talked about capturing images and storing them on your computer, along with various ways of scaling them down to your needs. Now we’ll look into lettering, and a workable, if imperfect, method of adding white letters to your models. Part II-Lettering. Using Basic Windows Programs to make graphics and lettering. SUPPLIES: What do I need? You can use most decent word processing programs to develop a lettering package for your model. Most Windows PC’s come out of the box with some sort of word processing program, most of which are very similar. There is also a Windows accessory called “Paint” (or PC Paintbrush on older versions), which I will play with in a later segment. You can use these programs to put together a decent lettering package for your model. The main problem is, once again, how do I print white letters? Well, as we discussed previously, unless you own an Alps MD series you can’t print white letters. But……you can print a colored background around your text. 1. Open your word processor program, in this example, Microsoft Word 2003. MS Word is part of the MS Office Suite, so you may not see it on a vanilla PC. It has a few more bells and whistles than the earlier versions, but is still very similar. Another program that strongly resembles this is Sun Systems Star Office, which is often included with many PC’s. First, open a new document. Go to the View menu, select Toolbars, and ensure that the Drawing toolbar is checked.
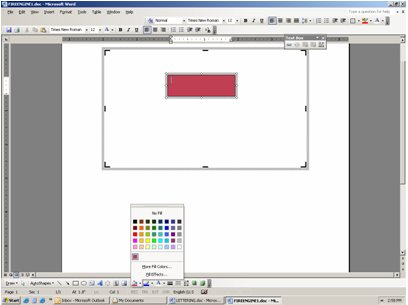
2. Next, find the Drawing Toolbar on your document. In this example, it showed up on the lower left side. Select Text Box. The icon looks sort of like an index card with an “A” in it. A screen will appear with a box on your document that says “Place Your Drawing Here.” Move your mouse into this box, hold down the left mouse key, and drag out a rectangle. This is your “text box”. Place your mouse pointer inside of the text box and click, this will ensure that the cursor is in there and ready to go
4. You now have a colored box in which to add your white (or gold, etc.) text. Notice the typing cursor is already in there and blinking at you. This is good. Find the Font Color button, which is usually right next to the font selector and size menu. There is a pull-down attached to this button as well. Click it and select the color you want (white in this case), then go ahead and type.
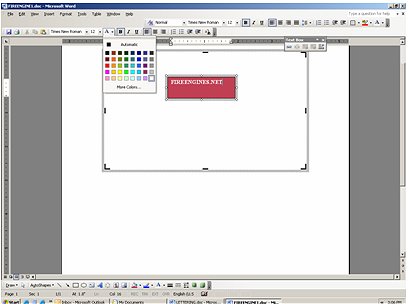
5. Final editing. You may have noticed that I never mentioned selecting a font style or size. That’s because up until now, it wasn’t necessary. You can now go back and edit everything you have done. For a font size, left click, hold, and drag over your text, highlighting it. Next, click in the Font Size box (upper left), and type in a value. 6-point lettering is approximately 1/16” (1.6mm), 12 point is approximately 1/8”, etc. Move over to the font selector box, and click away until you find a type that you like, in this case “Times New Roman”.
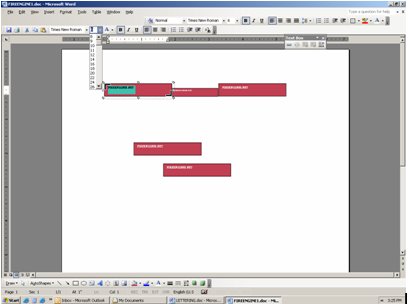
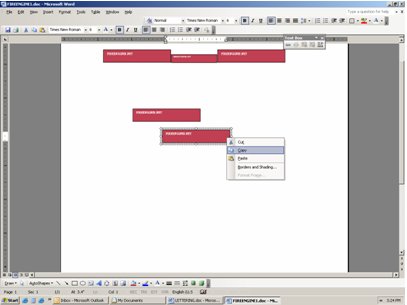
6. Duplicating. You can easily copy what you have done. Grab the outer box around your text box and drag its borders inwards, reducing it to the same size as your text box. Then just right click, Copy, and Paste. You can rearrange your Artwork any way you want. Make a test print on plain paper at maximum dpi to see how it looks.
Next time, I’ll play around with the Paint Utility in Windows. You can do some pretty neat stuff with that too.Until next time, good luck and stay safe!
|