Class 325 WW II rig

Showcase and discuss all fire related models, stations, dioramas.
Chariots of Fire
Posts: 225
Joined: Tue Mar 20, 2018 2:09 pm

Class 325 WW II rig

Post by Chariots of Fire » Mon Jul 23, 2018 5:03 pm

For the past few weeks I've been working on a new project that will ultimately end up in Hawaii. Back in WW II the US Army used a variety of equipment including this Class 325 front mount pump unit built on a 1.5 ton Chevrolet chassis. I was asked to build this piece for a WW II veteran who served with a fire fighting unit using these rigs in North Africa, France, Germany and Italy. So in addition to creating a bit of history it is being done to honor one of the "Greatest Generation".
ImageHosted on Fotki
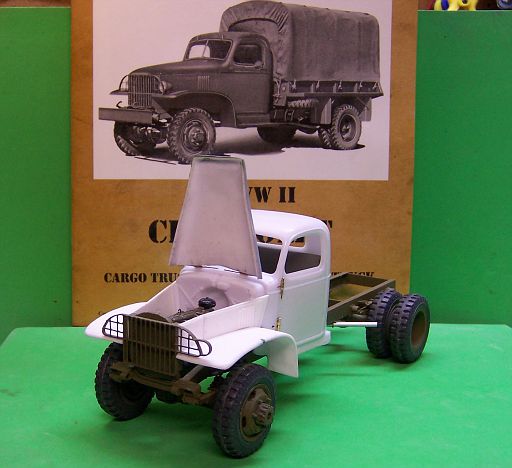
Progress has been slow as this model has to be scratch built from the ground up. Here is where it got started.
ImageHosted on Fotki
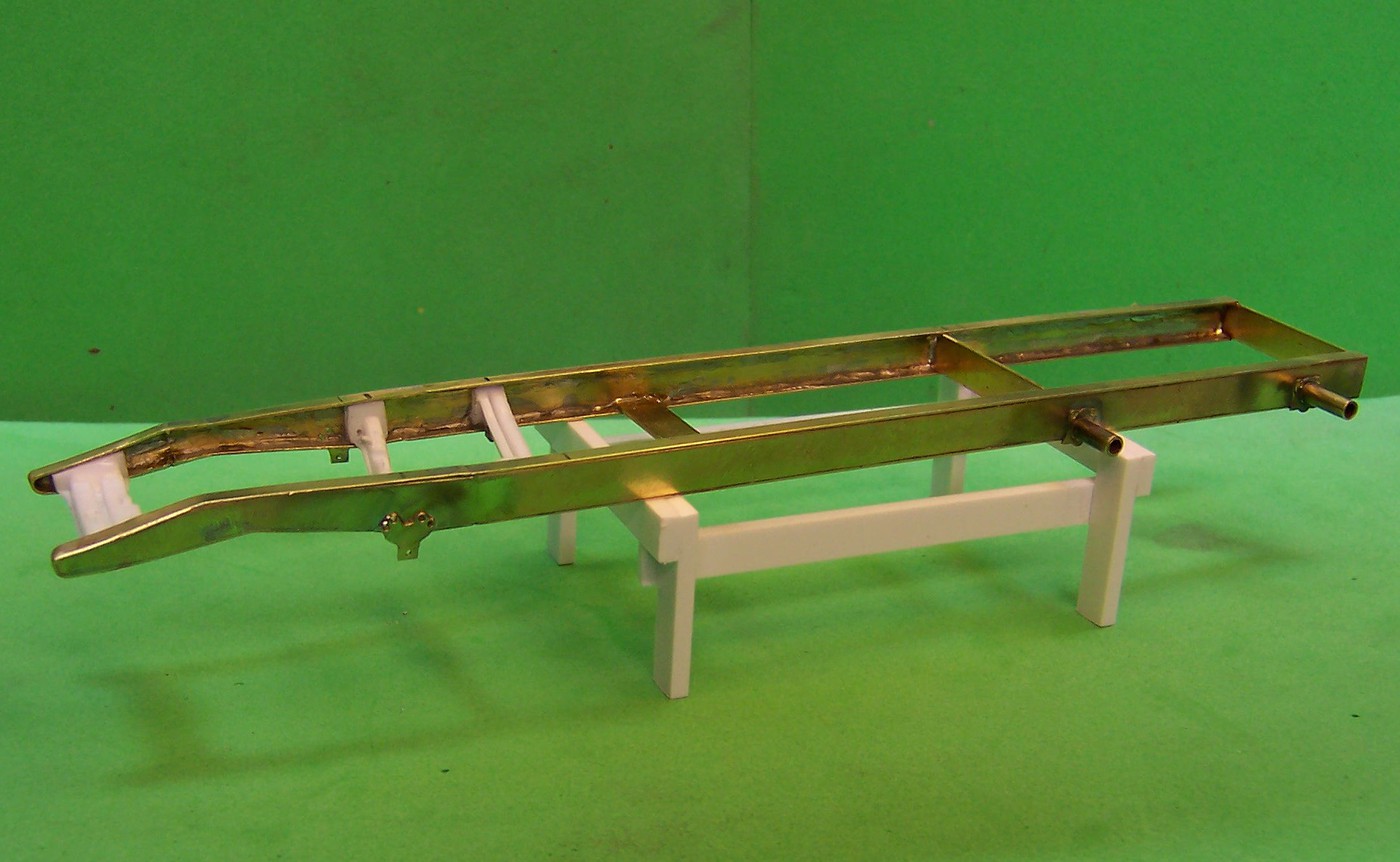
The frame is soldered brass, taken from drawings and information found in some technical literature for Chevy truck frames.
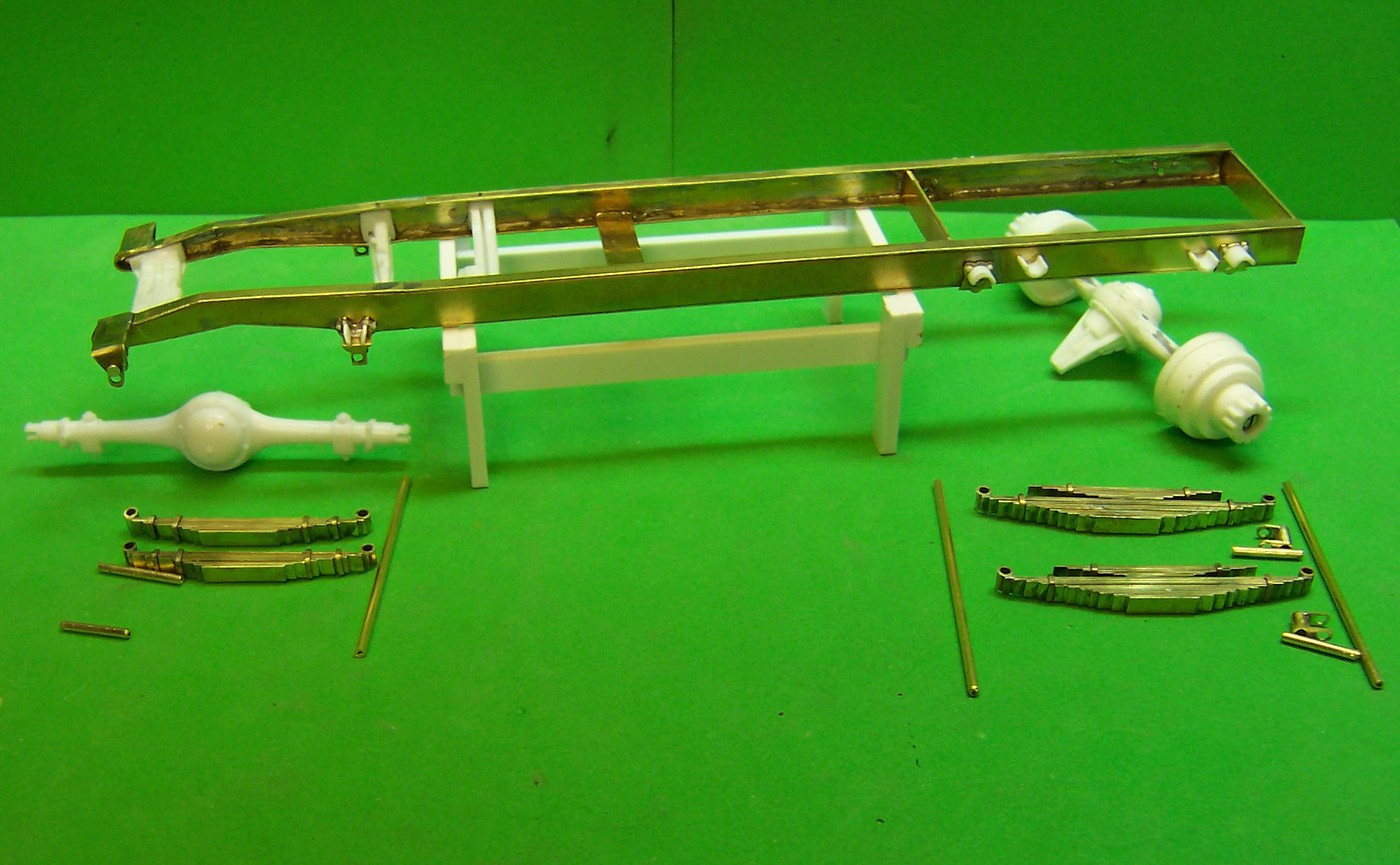
With the basic frame done the springs and mounting points were completed again using brass with a bit of plastic thrown in where a little detail was needed.
ImageHosted on Fotki
The springs are made of 1/8 x 1/64 strip brass, soldered together at the ends. Attachment points are brass tubing.
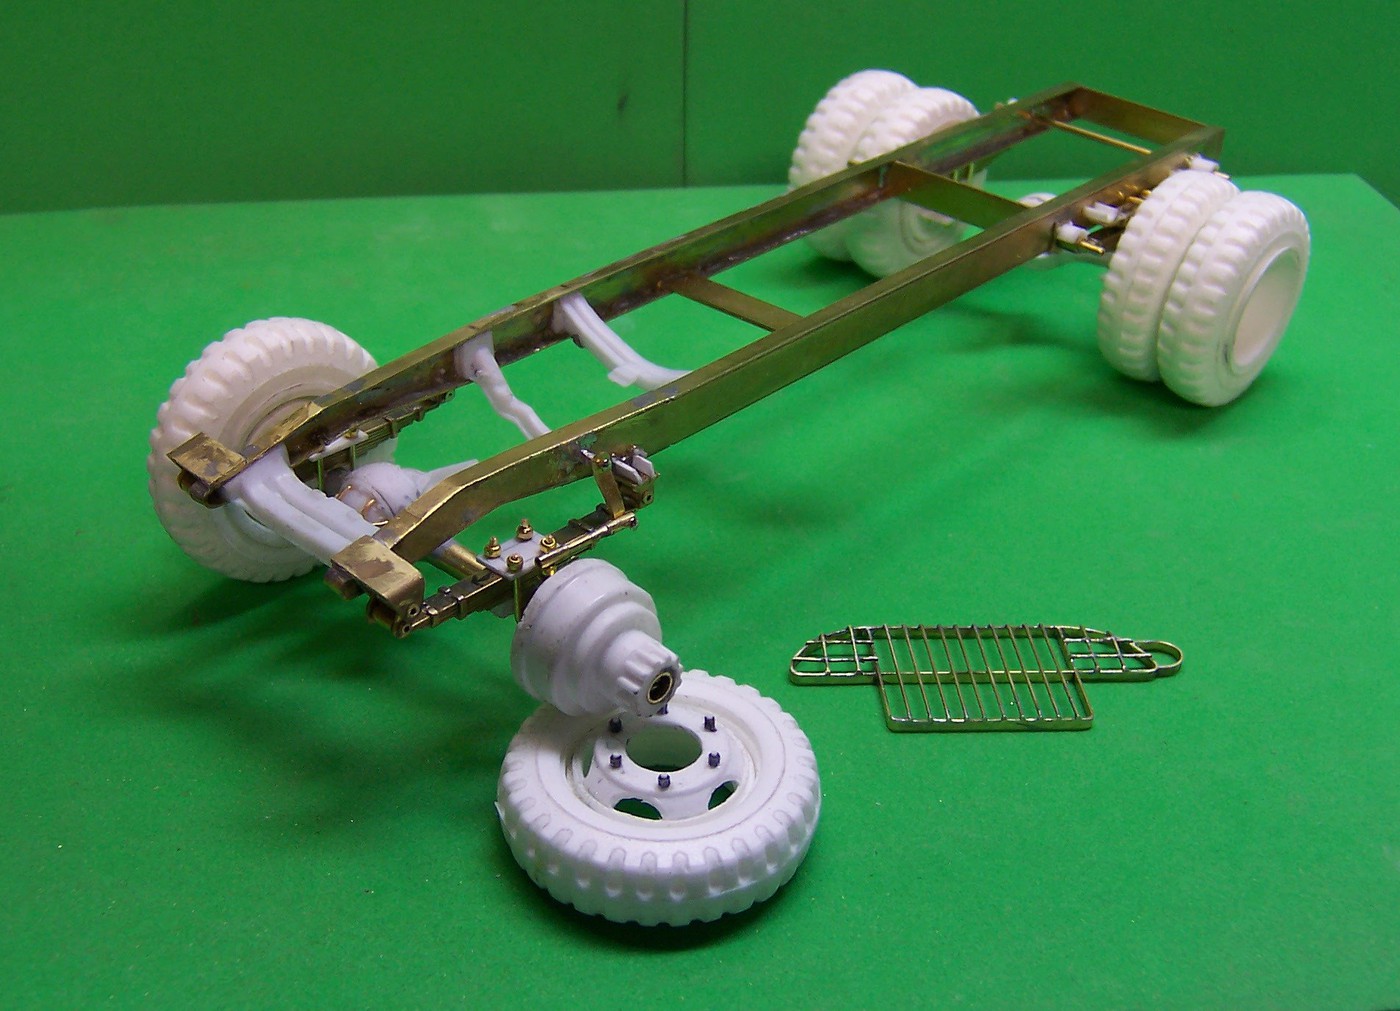
Next are wheels and axles. The axles are resin castings with the centers drilled out for brass tubing. The tubing gives strength to keep the resin from sagging over time and to allow for interior axles that allow the wheels to spin. Front hubs are made from brass channel and tubing. Inside the small tubing both front and rear is a piece of plastic rod superglued in place and drilled out to accept a small round head screw. The screw head is slightly larger than the brass tube that is inside the wheel so that when all is put together the wheels stay on.
ImageHosted on Fotki
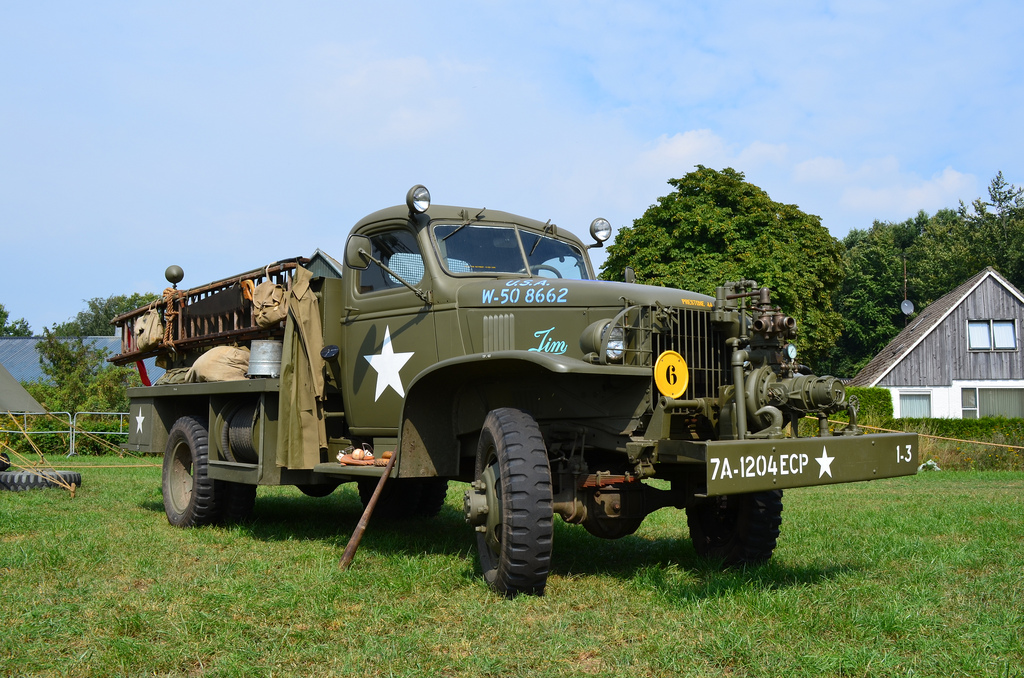
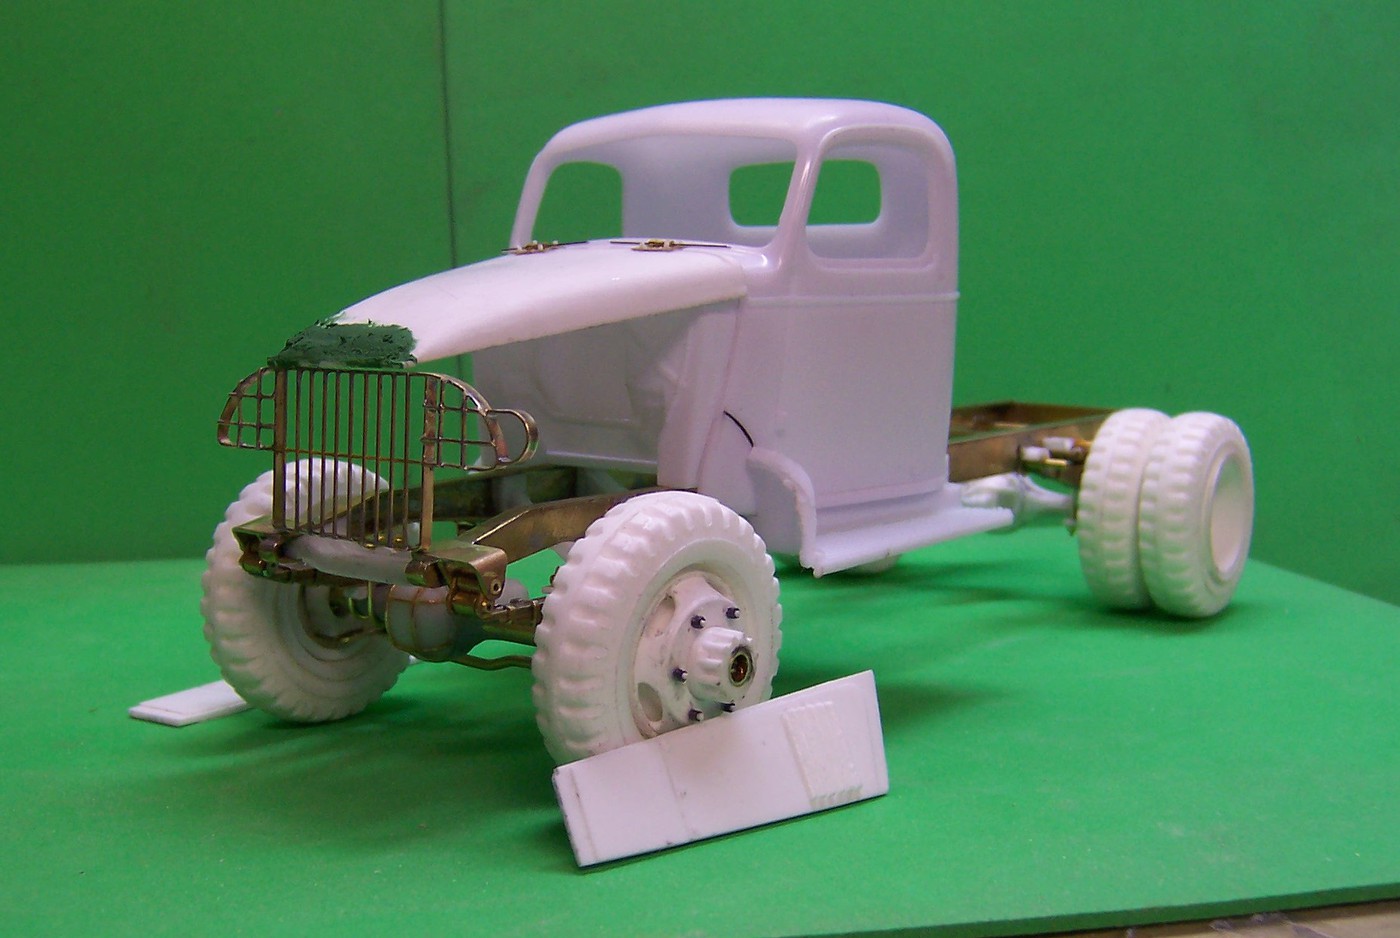
Beside the frame is the grill guard for in front of the radiator. Measurements of the actual grill were taken on a similar rig in Chatham Township, NJ that I paid a visit to last month. The grill guard pieces are strip brass and small brass rods, all soldered together. Tires are resin castings also made from a similar tire I found in the parts box. A two piece mold was made so that multiple castings can be done.
ImageHosted on Fotki
Here's the cab, hood and grill guard in place on the frame. The piece beside the front wheel is the hood side. The cab came from a Revell 1941 Chevrolet pickup kit. The army used the commercial cab and it was not changed from the civilian version except for the gage cluster and some instruction plates. Next in line will be to finish up some frame details and get on with making up the front fenders.

JoeO
Posts: 591
Joined: Wed Dec 27, 2017 9:58 pm

Re: Class 325 WW II rig

Post by JoeO » Mon Jul 23, 2018 7:24 pm

Awesome, glad you are doing it for a Vet!

Rich
Site Admin
Posts: 371
Joined: Tue Dec 26, 2017 11:24 pm

Re: Class 325 WW II rig

Post by Rich » Mon Jul 23, 2018 9:13 pm

Great subject Charlie, thanks for sharing it.
Administrator

User avatar
CCFR-45
Posts: 572
Joined: Thu Dec 28, 2017 12:11 am

Re: Class 325 WW II rig

Post by CCFR-45 » Thu Jul 26, 2018 12:20 am

This is going to be awesome.

Thanks for sharing
Steven

Check Out My Photography Website Full of Police, Fire, And Aviation Pictures.
www.bluefireflight.com

Chariots of Fire
Posts: 225
Joined: Tue Mar 20, 2018 2:09 pm

Re: Class 325 WW II rig

Post by Chariots of Fire » Wed Aug 01, 2018 3:33 am

Got a lot more done on the truck these past few days. Today the door and hood hinges were done and doors and hood are mounted. The doors were scribed with a sharp new Xacto blade and the results were pretty good. Only one place in the right side door that needed shimming to close up the gap between the door and the door opening. Some space has to be left for paint but all in all the fit is good.
ImageHosted on Fotki

User avatar
CCFR-45
Posts: 572
Joined: Thu Dec 28, 2017 12:11 am

Re: Class 325 WW II rig

Post by CCFR-45 » Sat Aug 04, 2018 10:26 pm

This coming along nicely! Thanks for sharing your progress. Looking forward to seeing more.

Thanks for sharing
Steven

Check Out My Photography Website Full of Police, Fire, And Aviation Pictures.
www.bluefireflight.com

Chariots of Fire
Posts: 225
Joined: Tue Mar 20, 2018 2:09 pm

Re: Class 325 WW II rig

Post by Chariots of Fire » Sat Aug 25, 2018 1:40 am

Things have continued in the right direction. Quite a bit done since the last post. The body is partially painted at this point and is nearly ready for doing the details.
Image
Image

JoeO
Posts: 591
Joined: Wed Dec 27, 2017 9:58 pm

Re: Class 325 WW II rig

Post by JoeO » Sat Aug 25, 2018 10:33 am

Wow

UnMarkedCarr
Posts: 123
Joined: Mon Jan 08, 2018 2:22 am

Re: Class 325 WW II rig

Post by UnMarkedCarr » Sat Aug 25, 2018 8:46 pm

Very nice! I look forward to seeing the finished product!

Chariots of Fire
Posts: 225
Joined: Tue Mar 20, 2018 2:09 pm

Re: Class 325 WW II rig

Post by Chariots of Fire » Wed Sep 26, 2018 3:51 am

Been quite a while since I posted about this rig but it is now finished. Will be taking it to Ohio in a couple of weeks. Then it will be sent to its final home in Oahu, Hawaii.

The cab and engine are from the Revell '41 Chevy kit. Other materials used are treadplate from Don Mills Hobbies, Universal joints on driveshafts from Shapeways, mastered by Matt Leese, hose is sewing elastic stained with Tamiya acrylic dark yellow thinned out, decals are computer generated and printed on an ALPS printer.

Additional materials: brass sheet, tubing, strip stock, plastic sheet, tubing, strip stock, two part resin castings made from masters such as the 4 gallon pump cans, back paks, 4 stacked buckets, tires, wheels, pump, hood, hood sides, running boards, fenders and headlight buckets. Booster hose is electrical wire. Paint is Model Master olive drab. Tires are painted with Model Master acrylic grimy black. Ladders from the AMT ALF kit. Hard suction is plastic tubing wrapped diagonally with drafting tape. Hose couplings are brass tubing. Shovel and nozzles on the rear step are hand made as well.

The unit lettering on the front bumper and on the back represent the 7th Army, 1204th Engineer Fire Fighting Platoon (EFFP). 1-1 stands for unit one of platoon 1.


Image
Image
Image
Image
Image
Image

Post Reply

Who is online

Users browsing this forum: No registered users and 0 guests