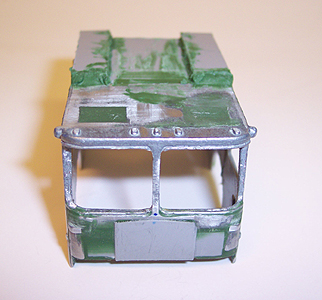
I have done most of the cab
structure since the last installment. The side panels have been
permanently attached, and most of the roof is done. A strip of 1/64
brass wire on each side serves as the piano hinge for the rear doors. I
put one tiny “tack” of super glue to hold them in place. Before I really
glued the panels into place, I did two important things:
- I made sure they were square and
perpendicular to the cab roof. I did this by using my machinist’s
ruler as a square;
- I checked to make sure the distance
between the sides was consistent from front to back, using dial
calipers. Everything was square and at right angles.
Once I had them right, I sparingly used a
gel-type super glue along the joint.

Checking for
square and fit |
Glued and
blued, tattooed! |
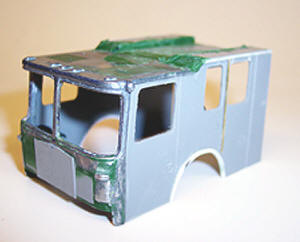
The roof section was also built up. Using
the drawings from HME, I cut the two top panels for the recessed area
where the ladder seats. These were glued on top the side panels with the
same care that the side panels were glued to the casting. I slipped a
few strips of plastic underneath them, then cemented them to a new roof
section that is flush with the metal part. Sure, it looks a bit rough. I
use Squadron green putty to fill the gaps, and not of it was fully cured
when I took these pictures. I’ve found a minimum of 24 hours is required
for this stuff to cure completely. Of course, the thicker it is, the
longer it takes!
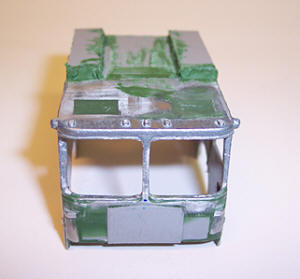
The Road Champs casting is notched on one side under the grill opening
to accommodate a hose tray or toolbox or something on the plastic
bumper. I didn’t notice this at first, and I had to adjust the cab. This
wasn’t as bad as I thought it would be, since one of the first things I
wanted to do was get rid of the clunky and very inaccurate grill and
headlights.
I laid thin strips of sheet plastic inside the cab, across the grill
opening, then filled it in with green Squadron putty. This was all
sanded smooth, and a new correctly shaped “grill” was cut and fitted to
the front.
What about the grill openings, you ask? I’m going to cheat a little on
that one (fun with decals), but I’ll cover it later. What about the
headlights? Honestly, I’m not sure yet. I have some ideas, but I have
plenty of time to figure out how to do it. If anyone has suggestions,
please feel free to email me. Notice the holes in the roof where the
cheap, lozenge like lights were. These were also backed with plastic
from inside of the cab, and filled with putty.
The front fascia. The roof is nice and level
all the way to the back of the cab. The ladder
will tuck in nicely
Now that I have all of the major panels in place (except
the rear), I decided it might be a good idea to do a little
“reinforcing”. For this, I used the infamous JB Weld two-part epoxy. I
mixed up some of this stuff (which I generally hate and NEVER use for
assembly), and applied it out of the way in a moderately thick bead,
along the glued joints. My thinking is that this stuff, which cures to
the hardness of glass, will take any stress off of the glued joints.
This is important since I will soon be going to work with a file and wet
sandpaper.
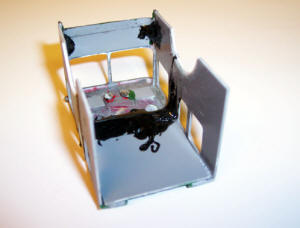
JB Weld
You
can see where the plastic roof panel butts up against the diecast part.
The
black goo is the JB Weld. It runs along the seam, and runs down the side
panel in a continuous bead. There is also a dab on each end of the
plastic sections behind the front grill. All in all, not bad for a
night’s work! In the next segment, I’ll start the body panels, and show
you how to get a recessed look for Roll-up doors. I should also have the
finish coat of primer on the cab by then. Until then, stay safe and
happy modeling!
Part 1
| Part 2 | Part 3
| Part 4
|