| The last installment left off with the
basic cab assembly. I used an X-Acto knife to scribe in the door
latches, and plenty of finish work was needed on the filled areas.
Finish work, such as applying filler putty, filing, and sanding is
where you have to have the most patience. The world's best paint job
will look like crap if the underlying surface hasn't been properly
prepped. After the filler putty cured, I used an emery board to
shape the roughest areas. After that, the filled areas were wet
sanded with a matchbook-sized piece of 400 grit sandpaper.

The cab (with
interior), primed and ready for paint
The reason I use such a small piece is that
it's easier to control. Neat use of putty (like removing as much
excess as possible before it cures) and careful use of an emery
board will keep sanding to a minimum. You don't want sandpaper
rubbing areas of smooth plastic that aren't supposed to be sanded.
Another reason is that a small piece of sandpaper can be easily
folded, and the edge used to get into inside corners. It almost acts
like a flexible file.
Don't be surprised when, after
all of this careful filing and sanding, you discover some
depressions or holes in the filled areas. Squadron green putty
shrinks a bit when cured, although less than any other filler I have
used. Holes may be the result of trapped air, and become exposed
once you file or sand the surface. The solution is to apply more
putty. File and sand as required. There is no magic bullet for this;
you just have to be patient.
A good way to gauge the quality of the prepped surface is to wet the
entire piece and hold it up to a light. Even the tiniest
imperfections will leap out on a wet, glossy surface. Since the cab
now looks good to me, I washed and dried it thoroughly, then primed
it with grey primer and put it aside in a safe place. I glued 1/8"
plastic angle to the inside walls of the cab, and temporarily
slipped in the existing (although chintzy) interior from the Road
Champs truck, checking for fit. I'll make a new windshield and
windows later. Now I'm moving on to the body work.
In Part 1, I talked about making templates with 8-1/2" x 11"
adhesive label paper. I'm using the same process for the rear
bodywork. Since I couldn't find a scale drawing of the Yonkers
truck, I had to rely on dead reckoning and "artistic license" to
produce the body panel templates. In short, they are estimated.
I have a good idea of what the wheelbase of the real truck is. I
have a scale drawing of the cab. I have plenty of good photos. Taken
all together, I was able to produce templates that are very close,
if not exact. The wheelbase on this particular model will be
identical to the Code 3 ALF rear mounts. I mentioned realistic
roll-up doors in part 2, and will now show you what I believe is the
simplest and best looking way to make them. Even though I am making
these for a "new" model, this technique can also be used to
"re-skin" a stock model. The plastic sheet I will use is very thin,
and you can convert a body with box frame doors to roll-ups, or
convert a quint into a straight truck by adapting this procedure.
There are three different templates, since three different patterned
sheets will be used for the exterior bodywork. The left one will be
for the deck, and will be made of HO-scale styrene diamond plate
from Plastruct. The center template will form the main part of the
side panels, and it's made from Plastruct HO scale styrene
corrugated siding. The last template is the outermost "skin" of the
side body panels, and is made of very thin, smooth .010 thick ABS
sheet, also from Plastruct.
The templates, printed out and ready for cutting
Once the templates are printed on the adhesive label paper, I cut
out each and affix it to the smooth, untextured side of the
appropriate material. It is critically important that the horizontal
lines of your template align perfectly with the pattern on the front
of the sheet. If you aren't careful with this, you can wind up with
a pattern that doesn't line up with your door openings or edges. Use
of a new, sharp X-Acto blade is VERY important. This is especially
important around the wheel well and outrigger openings, where
cutting is most delicate.

The plastic body panels.
Corrugated pattern (top) for the roll-up doors,
smooth (bottom) for the outside skin. The label paper hasn't been
peeled
off of the lower panel yet.
Once the two panels are cut, I
make a "sandwich", by layering the thin, smooth panel with the wheel
well and door openings over the inner panel with the grooved
surface. Before final cementing, I make sure they line up perfectly.
One tiny drop of super-glue in an inconspicuous corner will hold
them together well enough until you are sure they are lined up.
After that, apply more cement very sparingly around the outside
edges. Important: Avoid getting glue on the exposed grooved
surfaces. These are actually your "roll-up" doors, and any glue
stuck to them will ruin their appearance.
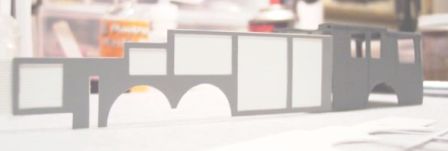
The assembled officer's side
panel.
The next step will be to "trim
out" the doors, and I will cover that in Part
4. This involves adding the frames and handles, and will also
utilize products from Plastruct. The panels will also be placed over
a sub-structure, made of brass sheet and bars, which will stiffen
everything and hold it all together.
Until then, thanks for reading, and stay safe.
Part 1
| Part 2 | Part 3
| Part 4 |
